


Epyx Development Kit
The Epyx development kit for Handy (the in-house name for the Lynx during its hardware development) consists of a number of items ranging from hardware to reference materials and software:
Mandy and Pinky
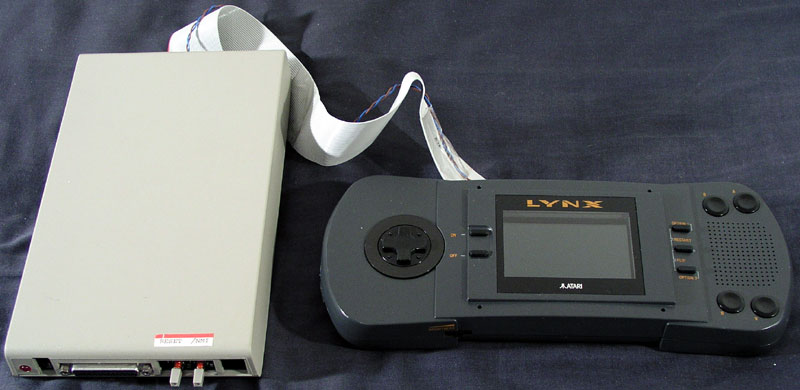
Mandy is a slightly modified, fully functional Lynx I that has the Reset and NMI pins connected and has a special “cartridge”. The cartridge is essentially a connector to Pinky. Pinky is a custom electronics board that sits between the Commodore Amiga and Mandy to facilitate the communication and optionally hold ROM images of your Lynx programs. It has two buttons to trigger the reset and NMI signal to Mandy. This is the Pinky/Mandy System for the Atari Lynx. A cheaper alternative to the 'Howard' system, the Pinky appears to be just a RAM cartridge of sorts with a parallel interface to a computer.
![WP_20140426_023_thumb[2]](./wp_20140426_023_thumb2.jpg "WP_20140426_023_thumb[2]")
![WP_20140426_009_thumb[2]](./wp_20140426_009_thumb2.jpg "WP_20140426_009_thumb[2]")
![WP_20140426_002_thumb[2]](./wp_20140426_002_thumb2.jpg "WP_20140426_002_thumb[2]")

These pictures are from my own development kit. In clockwise order starting at the top left they show
- Pinky and Mandy with a blue parallel cable and the special cable to Mandy
- Special cartridge in Mandy holding the cable
- Another shot of Pinky connected up to Mandy
- Outside of Pinky with the blue parallel cable and two buttons (Reset and NMI).
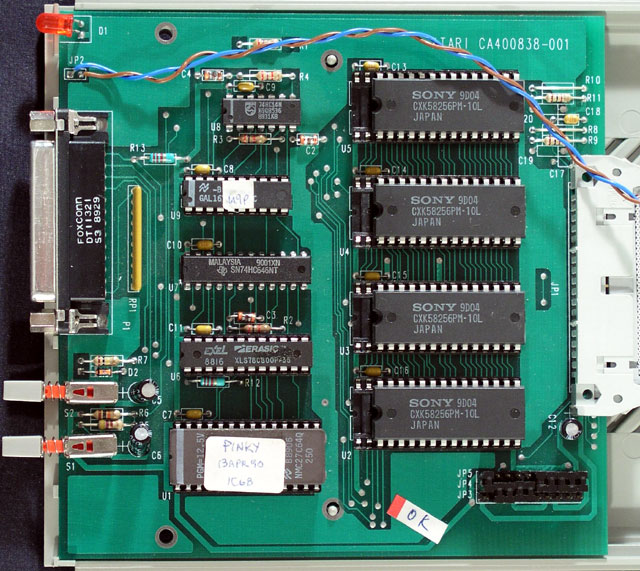
- Inside of Pinky
- Another shot of the Pinky circuit board - The Sony chips are RAM chips, and there's an EPROM with what I'm assuming is control code to make the device work properly. It appears that it basically just loads the game code into the RAM chips, and then it emulates a cartridge into the attached Lynx System (Mandy).
- Another shot of Mandy's blue connector plugged into Pinky. It connects directly to the cartridge port, with two other wires that are soldered to the main board of the Lynx.
You can see some additional pictures here at the Handheld Museum.
Howard and Howdy
This hardware set was more expensive than Pinky and Mandy, but offered some extra functionality. The set has two pieces of hardware called Howard and Howdy. Where Mandy is a full Lynx, Howdy has no processor and memory of its own. Instead, the guts of the Lynx exists in Howard, a PC case with a huge motherboard.


It holds the 65SC02 processor and lots of RAM and additional logic to offer functionality for bus monitoring and tracing of your code. Howard is connected to Howdy for display, sound and input. In turn, the Amiga is connected to Howard. The last two pictures (from this thread at the AtariAge forums) show the Howdy console connected to Howard.
The Epyx kit did not include the Commodore Amiga 2000 that was needed. You could have any Amiga machine, but the 2000 model was recommended because of its harddisk and memory.
Reference manual
A binder full with hundreds of pages detailing the internals of the Handy hardware, the use of the Amiga software and Epyx SDK for developing Lynx programs. When updates to the SDK were made, addendums were issued that you could place in the binder.


Software
The software accompanying the development kit is provided on a set of 8 disks that contain the Amiga software, source code and samples you need to develop Lynx programs.
The SDK’s 3.5″ floppy disks restore a Quarterback backup set to the system partition. You needed to have Quarterback software to use the disk. This is the way it works for the 1.6 revision of the SDK. Older sets may have worked in a different way. The backup sets were created using QB 4.2, but version 5.0 is also capable of restoring the set. The restore would add custom files for the Workbench 1.3 operating system under C2, replace some its system files in the C folder and place the SDK tools and source code (actual sources, include files, macros and sample code) in two folders called 6502 and HANDY.

The development software contained the compiler, sound and rom creation tools, and the source code for building Lynx programs. Additionally it had Amiga tools that made working with the Amiga as a development machine a little easier (e.g. faster fonts and a better text editor).
Working with Pinky and Mandy
Let’s skip a lot of things you need to do to create your first Lynx binary, be it a game or another type of program and pick up at the point where you want to run your program on real hardware. In the early days of Lynx development there was no emulator, so you could only see and test your code running on an actual device. Nowadays it is trivial to create an encrypted ROM, put it on a FlashCard and run it on a normal Lynx. In 1989 Lynx developers only had either Pinky/Mandy or Howard/Howdy. The focus is on Pinky and Mandy although most holds true for Howard and Howdy.
Pinky can function in one of two ways. It can be a FlashCard of sorts, where you can upload your code in the device and have it act as a cartridge to Mandy. Additionally, it can be a passthrough communication device that facilitates in a live (remote) debugging session between the Amiga computer and the Mandy console. A set of jumper switches allowed you to change the mode of Pinky and configure its memory size and use of the EPROM with the Pinky bootloader.

For a regular debug session with Pinky and Mandy you would connect Pinky to the Amiga with parallel port and Mandy using the propriatery flatbed cable. Next, you would start the Amiga and run the ManDebug debugger program. Here’s a small bit of what is happening under the covers when you boot a Amiga machine that has been modified by the Epyx SDK.


Essentially it assigns drive letters (symbolic names) to the two important SDK folders 6502 and HANDY. It also adds the HANDY drive to the search path, so you can run the SDK tooling from everywhere. Finally, the ManDebug program is launched separately from the Shell, keeping it free to do other things.
When ManDebug launches it presents a console application that looks somewhat like this screenshot in the WinUAE emulator:


Even though it is named HanDebug at the top, it actually is ManDebug. You can see so when you look at the greyed out tabs for Trace and ROM, plus the greyed out button that reads Bus Monitor. That is the missing functionality in Pinky when compared to Howard. (Thanks James Jacobs for the hint to change the Preferences to 80 column Text Mode)
The pictures below show what ManDebug looks like running on my Commodore Amiga 2000 computer, plus what Mandy shows on the screen after booting (a line indicative of the loader program placed in middle of video memory).

")
Booting Mandy
The Mandy console uses a normal Atari Lynx power supply with +9V DC. The power adapter powers both the Mandy and Pinky device and it needs the full 9 Volts to do so. Mandy switches on like a normal Lynx and immediately turns on Pinky as well. The boot process depends on the jumper settings. Assume that it set for the debugging scenario, meaning that it will use the Pinky EPROM as the first content on the cartridge.

It is encrypted in the EPROM and follows the normal decryption process once loaded by Mandy after booting and loading the “cartridge”. You can find the decrypted contents at $0200 like you would for regular (commercial) cartridges.
The Pinky EPROM will load a second stage loader that expects block of bytes to be uploaded from the Amiga via Pinky to Mandy.
0200 A2 66 LDX #66
0202 BD 1B 02 LDA 021B,X ; Copy second stage loader to $3000
0205 9D FF 2F STA 2FFF,X
0208 CA DEX
0209 D0 F7 BNE 0202
020B A9 08 LDA #08
020D 8D F9 FF STA MAPCTL ; set vectors for RAM
0210 A9 00 LDA #00
0212 8D FA FF STA CPU_NMI+LO ; set NMI to point to code
0215 A9 30 LDA #30
0217 8D FB FF STA CPU_NMI+HI
021A 80 FE BRA 021A ; sit here waiting for NMI
This part will copy the second stage loader from $021B (directly after the first part) to $3000. This address also serves as the NMI vector, i.e. the address that will be called when an NMI occurs. Finally, the first stage will stay in an endless loop and wait until a NMI interrupt occurs. Harry Dodgson explained this to be a “hardware lockout”. Indeed, the contents of the Pinky loader is general purpose and circumvents the need to have an encrypted header for the ROM itself and bypasses any checksumming on the contents of what is loaded. Essentially, it is a perfect troyan horse to get your homebrew code into a Lynx. The dependency on a NMI hardware signal makes it impossible to use this without a Lynx console that has been modified to allow an NMI falling edge to occur on the respective pin on Mikey. So, it is a lockout of the ROM using hardware.
Uploading the monitor program
The next step involves pressing the NMI button on the front of the Pinky device. It will trigger an NMI, and Mikey will jump to the NMI vector at $3000. That piece of code is going to wait for the following bytes to arrive through the parallel port:
Load address (2 bytes): LO, HI
Length (2 bytes in 2’s complement): LO, HI
Actual bytes of file
The first four bytes indicate the load address and length. The loader reads the data and copies it to Mandy RAM memory at the load address and finally execute the loaded code.
For debugging, it is necessary to first upload a file called monitor.bin. You click the Bootstrap button and a dialog opens that lets you specify the file.

The monitor.bin file has code that will communicate with the Amiga by using Pinky as a “dynamic” cartridge. It will use different cartridge pages to indicate which parallel port line it want to read from or write to. It will use the data lines of the port for data transfer and the input and output control lines for negotiating the conversation.
Mandy will run the monitor program after having loaded it at $F900-$FF00. The monitor will intialize itself by setting the IRQ and NMI vectors to point to its own two handler routines. It performs a handshake ritual to initiate the communication with Pinky whereby the connection with the Amiga is established. The title of ManDebug will change from “Parallel Port is DOWN” to “Parallel Port is ACTIVE”. Then the monitor sits idle waiting for the first incoming command from ManDebug.
Communication between ManDebug and Mandy
All electronics aside the communication between the Amiga and Mandy consists of sending commands from the Amiga to Mandy and receiving answers in the opposite direction.
It is always ManDebug that initiates a command, but the monitor needs to be in control. It can come into control in one of two ways:
- Pressing the NMI button on Pinky
This will create a NMI signal that causes the NMI handler in the monitor to execute, because the NMI vector is set to point there. At that stage the monitor takes over control and performs its handshake ritual. - A BRK instruction in code is encountered
Whenever a BRK is executed by the 65SC02 processor, it will perform its normal IRQ routine and jump into the IRQ handler. But, for a BRK instruction the B flag is set in the processor status register before it is pushed onto the stack. It allows the handler to inspect whether a normal IRQ from the timers came in or a software IRQ from a BRK instruction.
The IRQ handler is also inside the monitor and will check the presence of the B flag (for the BRK). If present, the NMI handler will be called. Otherwise, the normal IRQ jump table will be used to jump into the respective IRQ handlers that were (potentially) registered for the 8 timer IRQs of Mikey.
Debugging with ManDebug
The topic of debugging deserves a chapter of its own, as a lot can be done. ManDebug offers the following functionality during a debug session:
- Inspect and change internals of Mandy
This includes the registers A, X, Y, the processor status, stack pointer and current program counter address and the current RAM memory (entire range from $0000 to $FFFF). - Watch memory variables
The variables you want to inspect are single byte or double byte values located in memory. The current value is shown for the variable and update whenever it changes, provided the monitor is in control again. - Set breakpoints in the code
A breakpoint will cause the monitor to be in control again, so you can inspect the state of Mandy, alter it if desired and resume execution. - Step through the code instruction by instruction
It is possible to step into JSR routines or skip over them. - View memory structures
When there is a area of memory that has a specific layout (such as a Sprite Control Block (SCB), you can declare the structure of the memory and view the memory in a window that is specifically designed to show the structure. - Resume execution
This will restore the pre-interrupt state and resume execution of the program. It means that the monitor releases control and gives control back to the program again (at the risk of not regaining it by a breakpoint). - Fill a memory range
A single constant byte will be used to fill a part of memory. It can be used to wipe a piece of memory using all $FF for example. - Watch the Bus for special circumstances (Howard only)

- Upload a memory range into ManDebug
The specified range of current RAM memory values in Mandy is sent from Mandy to the Amiga and is stored in a file with a name and format you have chosen. - Download a file into Mandy
This will send the contents of a file from the Amiga to Mandy.


Sending commands
The ManDebug debugger can send its commands provided the monitor is listening for incoming commands. The handling is performed inside command loops. The main loop looks a little bit like this:
- Wait for command byte
- Check byte
0x00: Done
0x01: Download/Receive (from ManDebug to Mandy)
0x02: Upload/Send (from Mandy to ManDebug)
0x03: Continue
0x04: Slave request (?)
0x05: Go - Repeat from top
The Download and Upload commands are other loops, with subcommands. We’ll discuss those shortly. “Continue” will restore the pre-NMI or IRQ values for the stack, A, X and Y plus the processor status register and jump back to the previous address before the interrupt. “Go” resets the IRQ jump table and then do a “Continue”. I have not figured out what the “Slave request” is supposed to do, but I assume it puts Mandy in control to initiate requests to ManDebug.
A lot of the available main loop commands are revealed in an include file (from the Epyx SDK) called monitor.i. It shows the following constant declarations:
NOP_REQUEST .EQU 0
DOWNLOAD_REQUEST .EQU 1
UPLOAD_REQUEST .EQU 2
CONTINUE_REQUEST .EQU 3
SLAVE_REQUEST .EQU 4
GO_REQUEST .EQU 5
SEE_HOWARD_REQUEST .EQU 6
HIDE_HOWARD_REQUEST .EQU 7
The last two commands are not available in ManDebug (unfortunately), because of the missing hardware.
The “Download” and “Upload” loop have the following commands used by ManDebug:
END_OF_FILE .EQU $00 * Done and return to main loop
ORIGIN .EQU $01 * Set load address
DATA .EQU $02 * Transfer data (max 256 bytes)
RUN_ADDRESS .EQU $03 * Set run address
REGISTER .EQU $10 * Send/receive registers (A, X, Y, SP, PS and PC)
FILL_MEM .EQU $11 * Fill memory range with specified (single) value
LARGE_DATA .EQU $12 * Transfer data (max 65536 bytes)
Only commands 0, 1, 2, and 10 are used for Upload. Download uses all of them.
Using a combination of sending such commands, the functionality of ManDebug is implemented. For example, to download a file into Mandy, the debugger will send a DOWNLOAD_REQUEST first, then an ORIGIN command byte to indicate the load address, followed by LARGE_DATA (accompanied by the length and the actual data). It returns to the main loop again by END_OF_FILE.
With a logic analyzer you can actually see the bits going across the parallel port.

The picture above shows the data lines for a simple command sent from the Amiga to Mandy (through Pinky).
Breakpoints and stepping
Analysis of the various functionality showed that breakpoints and the stepping are actually made possible by replacing the instruction at a specific address with a BRK command. A pretty nifty trick that makes use of the IRQ handler to call the NMI.
For breakpoints the original instruction is remembered and replaced by BRK. When it the original instruction is restored. Stepping involves replacing the next instruction that will execute with a BRK. This can be determined easily if you know how the instructions behave. This is deterministic, even for branch instructions if you know the status flags. Fortunately, you can transfer the current state of the processor status as part of the whole set of 65SC02 registers mentioned earlier. When control returns after a step, the original instruction is restored and the next instruction is replaced.
It can happen that when a step is performed the next instruction is never reached. In that case ManDebug will report that control did not return. Your only option to regain control is by hitting a user-specified breakpoint or pressing the NMI button on Pinky.