ZX Spectrum - How to Get it Running!
Connecting it up
Connecting up a Spectrum is easy. The diagram below shows you the connections required:-

![]() Connecting to a television
Connecting to a television
If you have an old-fashioned (analogue) television like in the picture above, simply connect the RF (UHF) lead from your Spectrum directly into the back of your television.
 |
 |
A typical RF lead like that supplied with your computer. The left plug in the left picture goes into the television, and the right plug goes into the back of the Spectrum. If you don't have one of these they are available in all good electrical retailers or buy one from an online auction site, such as Ebay. |
A typical RF (or component video) to SCART adapter |
Some more modern LCD televisions do still have an RF input on the back , but large LCDs and plasmas do not. If you are unfortunate to own one of these newer televisions (!), it may still have other analog video inputs such as RGB component video or SCART sockets - these can take an analog signal like your RF output from the computer is sending, but will need an adapter to convert the RF signal to either SCART or component video (RGB).
![]() Connecting a Cassette Recorder
Connecting a Cassette Recorder
The ZX Spectrum stores programs on tape (audio cassette). Later models also allowed the use of 3" floppy disks. But most games and other programs for the ZX Spectrum were sold on tape. From your cassette recorder (assuming you still have one), connect it to the computer's EAR socket on the back - this is used to play tapes "into" the Spectrum. To record anything to tape, you will also need to connect the cassette recorder to the Spectrum's MIC socket. If you don't have a traditional cassette recorder, any will do, as long as it has a headphone socket so the audio output can be sent to the Spectrum. Typically this will be either a 2.5mm jack socket or a 3.5mm jack socket, which is the same type as on the Spectrum end.
![]() Connecting up the Power
Connecting up the Power
The Spectrum takes power off the 240V AC mains via it's own power supply which converts it down to 9V DC.

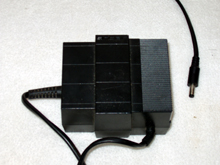


Plug the power supply into the mains, and then plug the other end into the back of the Spectrum. The 16K, 48K and Spectrum + have a standard small power plug with centre being negative, outside being positive, but the +2A/B and +3 use a different power supply with a larger DIN plug on the end.
![]() Power On !
Power On !
Now you're ready to power up. On older Spectrums, simply by plugging in the power lead, you've switched it on - there is no on/off switch. On the +2A/B and +3 there is a power switch. Once you've switched on the Spectrum, and got it tuned in, you will see a screen like one of the ones below:
 |
 |
 |
If you see either of the two right-hand screens, just choose 48 BASIC by using the cursor keys, and hit ENTER. This will get you to the screen that looks similar to the first one.
![]() Tape Loading
Tape Loading
Insert the cassette you want to load into the cassette recorder.
For the original 16K, 48K and Spectrum+, the Sinclair BASIC had a very neat shorthand so that single-keypresses would type out entire keywords. For these computers, hit "J", followed by holding down Symbol Shift and hitting P, then hold down Symbol Shift again and hit P.

For the Spectrum 128, +2 and +3, you need type in L-O-A-D "" in full.
This should result in the screen showing:
LOAD ""
Hit enter and press play on the cassette recorder. If all goes well, you should hear and see the tape loading, with the cyan and red lines in the border, following by yellow and blue lines:-

Usually in about 4 minutes the game has loaded. Some very old programs require you to do a "RUN" <enter> to actually run the loaded program.
If it seems to struggle, try adjusting the cassette recorder's volume or tone controls (if you have them), or try forwarding the cassette to the end and play the other side. Most commercially bought tapes contained identical content on both sides of the tape.
Usually the order in which blocks a program is made up of is something like:
Program: frogger
Screen: frogger
Bytes: frogger
<loaded>
A program cannot begin loading with a 'Bytes' block. If is shows it reading this first, rewind some more and try again.
![]() Saving to Tape
Saving to Tape
Make sure you plugged in the MIC lead into the back of the Spectrum and your tape recorder, otherwise it won't record!
If you've written a program in BASIC that you want to save to tape, just type:
SAVE "frogger"
Then hit record (or possible record and play together) on the cassette recorder. You should see the screen start to save your program. When it's done, you'll see an "OK" message.
Other Useful Commands
| To do this: | Type this: |
| reset the Spectrum (when in BASIC) | NEW |
| to load a program from tape | LOAD "" |
| to run a program | RUN |
| to list the contents of your program | LIST |
| change the colour you write text in | INK <colour from 0-15> |
| change the colour of the border | BORDER <colour from 0-15> |
| change the colour of the middle bit of the screen | PAPER <colour from 0-15> |
| assigning a value to a variable | LET a=10 |
| assigning a string to a variable | LET a$="Hello world" |
![]() Spectrum +3-only Commands (Disks)
Spectrum +3-only Commands (Disks)
When switched on, the Spectrum +3 automatically looks for a file on the inserted disk called "*". This program cannot be produced by BASIC. If found, it loads and runs. If not found, it then tries to load and run a program called "DISK". If this is not found either, it gives up and returns to the user.
| To do this: | Type this: |
| to load from tape in +3 mode | LOAD "T:" |
| to list the contents on tape in +3 mode | CAT "T:" |
| to load from disk 1 (the built-in disk drive) | LOAD "A:frogger" |
| to load from disk 2 (the external disk port on the back) | LOAD "B:" |
| to load from RAMdisk | LOAD "M:" |
| to save to disk 1 | SAVE "A:frogger" |
| to copy from tape straight to disk | LOAD "T:fred": SAVE "A:fred" |
| to get extended info about what's on a disk | CAT EXP |